
You can uninstall an application or program off your computer if you no longer utilize it or if you want to free up space on your hard disk.
This will demonstrate how to use Programs and Features in the Control Panel to see, uninstall, change, or repair programs that are currently installed in Windows 7.
If the program you desire to uninstall is not listed in Programs and Features, then it may not have been written for this version of Windows. To uninstall the program, check the data that arrived with the program, or go to the program publisher’s/manufacturer's website. Most programs install automatically in the C:\Program Files folder (option 3 below). Search in this folder some programs also include an uninstall program that you can use.
Programs and features embedded with Windows 7 can be turned off in Windows Features.
If the program doesn't uninstall completely the first time, sometimes running the uninstall program a second time will succeed.
If the previous choice doesn't cultivate, attempt uninstalling the program while Windows 7 is running in safe mode.
If you installed the program recently, you can try using System Restore to return your computer’s system files to an previous restore point dated before you installed the program.
OPTION ONE
Using Programs and Features
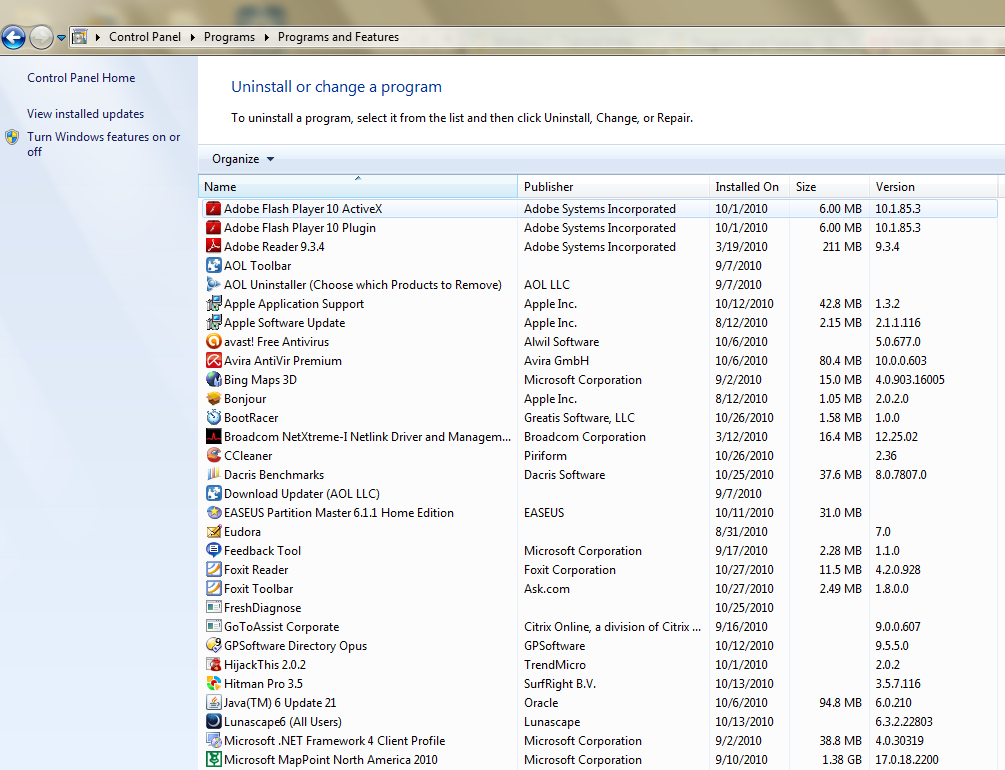
1. Open the Control Panel (icons view), and click on Programs and Features.
2. Select a listed program to highlight it and see the accessible options on the toolbar for that program.
NOTE: The options will be either Uninstall, change, Uninstall/change, Repair, or modify/Repair. A program may not have all the options available for it.
If mouse is set to single click, then hover the mouse pointer over the named program to select it.
If mouse is set to double click, then left click one time on the listed program to choose it.
A) Click on the Uninstall or Uninstall/change (depending on the button displayed) toolbar button.
ORB) Double click on the selected program.
OR
C) Right click on the chosen program, and click on Uninstall or Uninstall/change (depending on the pick available).
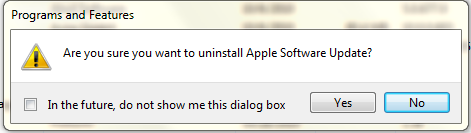
D) If you had only the Uninstall pick, then you may require click on Yes.
F) Adopt the rest of the onscreen instructions to uninstall the program, then go to step 6.
NOTE: Some programs may require a restart afterward.
4. To modify the Program
NOTE: This will allow you to install or uninstall optional features of the program without uninstalling it. Not all programs use the modify button, and may offer only Uninstall.
A) Click on modify or Uninstall/modify (depending on the push button displayed) toolbar button.
OR
B) Right click on the selected program, and click on modify or Uninstall/modify (depending on the choice available).
C) Follow the rest of the onscreen instructions to change the program, then go to step 6.
NOTE: Some programs may require a restart afterward.
NOTE: Repair is usually used when you require corrupted files and settings substituted with original ones from the selected program's installation program. Sometimes the entire program is just reinstalled with all files overwritten and settings returned to default for the selected program. Not all programs use the Repair button, and many of them will offer only Uninstall.
A) Click on the Repair or modify/Repair (depending on the button displayed) toolbar button.
ORB) Right click on the selected program, and click on Repair or change/Repair (depending on the pick available).
C) Follow the rest of the onscreen instructions to repair the program, and then go to step
NOTE: Some programs may demand a restart afterwards.
6. When finished, close Program and Features.
OPTION TWO
Uninstall a Program through the Start Menu
NOTE: Some programs will add a shortcut in the Start Menu All Programs area that includes a pick to uninstall it.
1. Open the Start Menu and click on All Programs.
2. Click on the program's folder to expand it.

4. If prompted by UAC, then click on Yes (if administrator) or typewrite in the administrator’s password (if standard user).
5. Follow the remainder of the onscreen instructions to uninstall the program.
NOTE: Some programs may require a restart afterward.
OPTION THREE
Uninstall a Program through the Program Files Folder
NOTE: If the program is not named in Programs and Features (choice ONE) and is not in the Start Menu (option TWO), then you may be able to uninstall the program through the Program Files folder.
1. For 32-bit Windows 7, open the C:\Program Files folder, and open the program’s folder.
A) Go to step 3.2. For 64-bit Windows 7, open either the C:\Program Files folder for a installed 64-bit program or C:\Program Files (x86) folder for a installed 32-bit program, and open the program's folder (ex: picture-shark).


4. If reminded by UAC, then click on Yes (if administrator) or typewrite in the administrator’s password (if standard user).
5. Adopt the rest of the onscreen directions to uninstall the program.
NOTE: Some programs may require a restart afterward.


